Free Bar Plan:
5 Easy Steps
This free bar plan is a simple home wet bar design offered as a FREE sample of our home bar project plans. It consists of a simple base support framework, a "wet bar" drink prep workspace, and a bar top with a beer gutter. Assembly is easy, and this home bar can be used permanently or as a semi-portable bar. Review the suggested materials and tools, watch the video, then proceed to the easy assembly steps below.


Free bar plan recommended materials:
- Ten 2"x 6"x 8' construction studs
- Two sheets 3/8" OSB (Oriented Strand Board) sheeting
- Two Sheets finish grade plywood.
- Two 8 foot sections of Chicago Arm Rail
NOTES: For permanent installation, use 2 x 6 framing studs to allow for easier routing of plumbing and electrical. To lower costs or make the bar more portable, use lightweight 2 x 4 framing studs.
Required Tools
- circular saw.
- cordless drill.
- tape measure.
- pencil.
Fasteners:
- 1 box 2 1/2" drywall screws.
- Glue - either standard wood glue or PL-200 adhesive.
Bar Rail:
The arm rail uses Chicago Style Arm Rail Molding. The most affordable bar rail I've found is House of Fara Bar Arm Rail that you can buy at any Home Depot store or order online. At about $65 for an 8-foot section, it comes out to only $8 per foot. Compare that to other arm rails you find online and you will be pleasantly surprised. Add an optional footrest using tubular Brass Rail. If you want to get really fancy, you could also add trim, corbels, and appliques. Watch the video below then read below for the step-by-step assembly.
Free Home Bar Assembly Video
If you find this video helpful, please be sure to like and subscribe to our Easy Home Bar Plans Youtube channel and our Easy Home Bar Plans Facebook Page to receive future video updates, member completed project photos, and home bar construction news.
Free Bar Plan Construction Instructions:
Be sure to also see our Home Bar Photo Page featuring over 150 photos of home bars built entirely by our site members using our home bar plan sets.
Step By Step Home Bar Construction:
Follow these five easy steps to building this simple home wet bar.
STEP 1: Frame the Front and Sides
Frame the base front and sides.
Framing requires a total of 10 boards, cut as follows.
- Front base and top (2) = 84"
- Side bases and tops (4) = 24"
- Vertical upright boards (12) = 38"

This rending shows how many boards to cut from the ten 2"x 6"x8' boards.
Assemble the framing as shown in the video above. Here are some fastening tips...
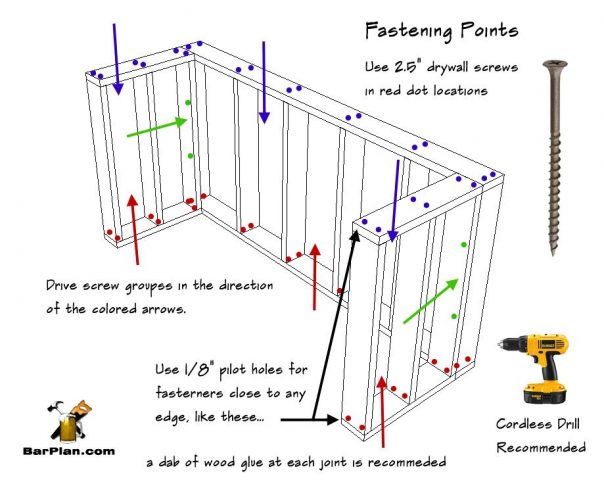
Detailed fastener locations and tips.
When completed, you should have something that looks like this...
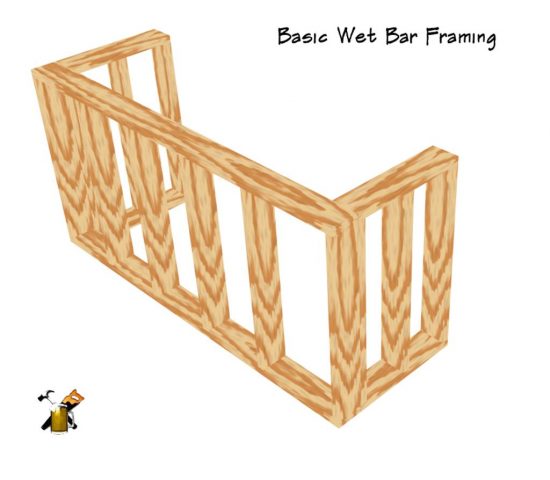
The basic wet bar core framing. It doesn't get much easier than this.
STEP 2: Apply Side Sheeting
Measure, cut, and apply side sheeting. One structural layer of 3/8" OSB is recommended. Optionally use finish grade 1/2" sheeting or cover OSB layer with paneling or stone product of your choice. Before you continue, consider adding a Kegerator to the bar by adding a cutout to the work counter. Most standard Kegerators will fit.
Using the "measure twice, cut once" method, measure the side panels size against the existing frame you already built. Then, measure and cut the front panel.
STEP 3: Cut Bar Top(s)
Cut the dual-layer bar top from two sheets of finish-grade plywood. The bottom layer provides the 'lip' for the beer gutter and arm rail and offers added strength. The top layer is slightly smaller and should be the best grain pattern of the two sheets.
STEP 4: Cut the Arm Rail Molding
For this project, you will need a total of 98+36.6+36.5=171 inches of rail material. As you may notice, the front rail may have to consist of two spliced sections as it exceeds the 8-foot length of most stock bar rail by two inches. An easy fix would be to subtract 2 inched from the overall length of the bar. Check out the Bar Arm Rail Molding page to find sources and techniques for various types of bar rail.
Join the site to learn to build over a dozen other home bar designs and bar room projects.
STEP 5: Finish Up and Trim
Finish up by installing the wet bar workspace shelf and inside panels. Trim the exterior as you see fit. This site has many examples of complete home bar projects and framing techniques. Add a kegerator or compact beer cooler and you're ready to start entertaining at home. If you would like more detailed information on building a home bar, join the site to get full access to our other downloadable plan sets.
Don't forget the Bar Stools:
No home bar project is complete without a set of bar stools. You can buy them locally or from the world's largest online superstore...and get free shipping. See our Recommended Bar Stool Models

Instant Access to ALL these Cool Bar Plans
More Advanced Projects:
This free project is just an example of our entire Home Bar Collection of projects. You can access the whole collection for a small site membership fee. All designs are drawn in 3D views. Projects are downloadable in printable PDF format.
Each set includes full material and cut lists plus easy-to-follow step-by-step assembly instructions. Full membership also includes access to our Builder's Gallery and Forum areas for project help and great design ideas. See What's Included with Site Membership.
As a member, you get access to a variety of home bar projects including:
- Straight bars
- Wet bars
- L-shaped Bars
- 45 degree angled corner bar
- Hexagon bar
- Full bar back
- Outdoor tiki bar hut
- Digital jukebox cabinet and more.
If you're a quick start type of person, our free bar plan video shown above may be all you need. It's an easy-to-build bar that can be moved about with any herniation. Take a look and if you need more info or have any questions, post a comment below. Be sure to subscribe for free to the Easy Home Bar Plans Youtube page to be notified of new home bar construction videos. We hope you enjoyed this free bar plan project.