Forum Replies Created
-
AuthorPosts
-
The bottom line, if a part goes negative, you just eliminate it.
You can put the plans on a USB stick and take it into Office Max of Office Depot to print. Just be sure to write down the document password.
4-2025 and still aactive – where everyone at?
Is there anybody, out there?
bump 2025!
I’ll take a stab at this one…
First, what is the purpose of increasing the main bar section width? Do you need to fit some equipment in that space?My guess is that nobody has ever tried increasing the width so, at first glance, it looks like 23.5 should be 28.5.
99.9% of builders use this tool to lengthen or shorten a section. Can’t say I’ve ever tried modifying the width, but maybe the original designer can weigh in on this.
My guess is that the width of that section is not really advised, especially since it has a 30″ limit. Any modification beyond that and you would just use the red highlighted changed parts and extend at will.I use this tool for custom bars projects I build for clients, but always use it as a guide, not the final word.
In a lot of cases, I see the sheeting does not change, but if that is the case, you just measure against the frame you have modified.
Again, I use it as a guide.Hope that helps a bit.
August 9th 2021, – I have been stocking the back of my bar with provisions. Makes a great basement bunker.
August 9th 2021, after a few months of relief, back to lockdowns and draconian measures. 2 weeks to stop the spread…it will never end.
Before you start building your keg box, it’s good to get a short primer on the working of a refrigeration system.
The basic principle of any refrigeration system is not to make things cold. Well, it does that, but it does so by REMOVING HEAT.
So, a few basic rules to follow when building a keg box are:
1. Prevent heat from entering the box area. Insulate it well!
2. Maximize the efficiency of your cooling system by keeping air inside the box moving.
3. Add an aluminum heat sink to the freezer plate and blow fan air past it.
4. Never forget to insulate UNDER the floor!
5. Don’t open the door unless you are changing out the keg or defrosting.Take a look at this schematic diagram of a basic refrigeration system:
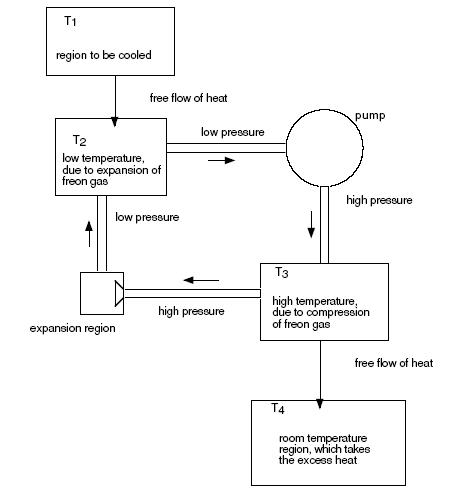
T1 is the air and items inside your keg box.
T2 is the freezer plate inside your fridge.
T3 is the rear coil usually on the back or the fridge, some new models enclose this coil.
T4 is your ambient room air.Heat needs to be removed. That’s our entire goal. So, if you can speed the air passing the freezer plate, you will speed cooling inside the keg box.
Think of the big soda coolers at the local 7 11 or liquor store. Open the door and you can hear those fans blasting away.
For our purposes a small 12 volt fan like the one in your PC will work fine and is very quiet. You can buy cooling fans on Amazon.comOn the outside of the fridge, we need to expedite the departure of heat from the back of the unit. While the older “exposed” coil units do seem to work a little better, just keeping air circulating back there is a good idea for both the exposed and enclosed coil models. It helps cool the compressor too, making it last longer.
Many people have asked if this model fridge or that model fridge will work…
Here’s the test…
Plug in fridge…wait 30 to 60 minutes.
If the freezer plate gets cold to the touch and builds frost, it will work.If your unit does not have a freezer plate, it will still work, but the more surface area the better, so fill a bunch of old soda bottles with salt water and stack them in the fridge. Salt prevents freezing.
Then position your fan to blow the relatively warmer air from the keg box across the water bottles. You may have to set the thermostat setting to near it’s max.
Hopefully this quick, rather unscientific explanation will help.
Post any questions or comments.Should be easy enough to swap. It’s pretty much symmetrical.
If you just copy the overhead view, then flip it 180′ and paste for the reverse layout.April 21st and still on lock down.
Hope your envirotex job went well.
Poly is always a good idea.
I prefer satin, not glossy.What is your delta X, Y and Z?
In other words, what exactly did you change in length, width and height?
Then I can verify. You can screen shot the CHBP panel and post here, which would help.However the issues in framing appear to be in width.
Not sure what “issues” mean exactly.
Yes, it is very easy to simply lay it out in reverse as all the plans are completely symmetrical.
In my basement, the drain goes to an elector pit, then out to my septic system. I routed the sink drain through a wall adjacent to on side of the L-shaped bar leg. All my electrical goes through the wall to a sub panel that is fed from the main panel. If electrical or plumbing is beyond your current skill set, there are many great Youtube videos out there on the topic.
Also, be aware that in some municipalities you will need permits to modify plumbing and electrical, but where I live out in the country, you can do pretty much whatever you want without any permits or inspection. Plus, I an a retired electrical engineer, so this stuff is child’s play.
Just be sure you do it right and don;t create any fire or flood hazards. Always consult with a local plumber or electrician if unsure. If you have a plumber or electrician friend, buying them a few beers at your new bar is a great way to get some inexpensive or free help.See the wet bar definition page for more ideal on wet bar plumbing and electrical tips.
In my basement, the drain goes to an elector pit, then out to my septic system. I routed the sink drain through a wall adjacent to on side of the L-shaped bar leg. All my electrical goes through the wall to a sub panel that is fed from the main panel. If electrical or plumbing is beyond your current skill set, there are many great Youtube videos out there on the topic.
Also, be aware that in some municipalities you will need permits to modify plumbing and electrical, but where I live out in the country, you can do pretty much whatever you want without any permits or inspection. Plus, I an a retired electrical engineer, so this stuff is child’s play.
Just be sure you do it right and don’t create any fire or flood hazards. Always consult with a local plumber or electrician if unsure. If you have a plumber or electrician friend, buying them a few beers at your new bar is a great way to get some inexpensive or free help. -
AuthorPosts